Is something organic if it is shipped across the country? What about the fuel that is used and how that affects our environment, not to mention the freshness of the food and a myriad of other factors. Over the last few years i have been reading everything i can get my hands on to help me answer these and other questions so sit back, relax and explore where my quest has taken me thus far.

Saturday, October 31, 2009

Pumpkin Soap


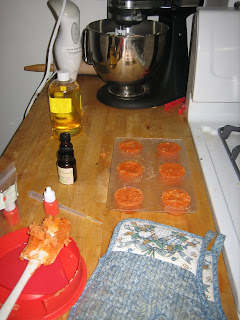
Hello all you ghosties and ghouls.  I hope everyone has fun times planned for this devilish evening.  To kick off my Halloween celebration I reinvented one (my first and only so far) of my home made soaps into another soap.  This is a process called re-batching, literally remaking the batch.  I wanted to do this because the soap is made with all-natural oils, has a great lather and leaves my hands feeling "silky and smooth" but it was uglier than a goblin's big toe.  

To make a re-batch, I surfed around the net and came up with sort of a hybrid recipe which I will list below.


6.2 oz. ugly soap, I chopped it up in the food processor
2 oz frozen goats milk (yes i keep frozen goats milk in my freezer because, you never know when you will have a goating emergency)
1 oz avocado oil
.5 oz beeswax, I have seen that many experienced soapers like to add this to their recipes so I thought what the heck

Directions:
Place all the above ingredients in a double boiler and let it go slow and low for approximately 2 hours I used a 4C Pyrex measuring cup and a pot, I had to replenish the water twice, stir regurarly to help remove the lumps.  Because i have never done this before I was not sure what to expect and look for or wait for so once the consistency stopped developing (after about 2 hours in this case) I removed the Pyrex cup from the pot and added the below ingredients.


 12 drops of liquid orange (it is as bright as a hazmat suit I swear)
6 ml Pumpkin Spice essential oil
1 ml Cinnamon Sugar essential oil


I tried to use my hand blender but it was pretty ineffective so I went back to stirring by hand with a spatula.  The soap started to harden so I put it back into the pot and let it re-soften.  While that was going on I lightly sprayed my pumpkin molds with some olive oil, I thought it would help to get them out when they were ready.  With the Pyrex cup still in the pot and the flame still on low I started to scoop the soap out and into the pumpkin molds, I did this slowly and tried to push as much soap into the molds to help with getting the air bubbles out and to get the soap into the cracks and crevices of the little molds.  once that was all done, I scraped the top to remove any excess (which I formed into a little ball, no sense in wasting) and then popped them into the freezer. 


I left them in the freezer for about 45 minutes and just pulled them out, I may not have needed the olive oil I found that simply squeezing the sides worked great, they just popped out.  While they are not perfect little pumpkins, they are  my little pumpkins and totally usable, besides now my whole kitchen smells like pumpkin pie!


The finished product!  So they are a little deformed, they are pumpkins!

Have a SPOOKTACULAR evening!!!!


~CM


Tuesday, October 27, 2009

Halloween Happiness


I love fall, I can smell it in the air, the crispy dry leaves and the delightful chill that surrounds me as I walk to the bus in the morning.  Halloween is this weekend so I thought that it would be fun to post a little Halloween themed recipe, it is fun and, of course, delicious.  We made this when we were camping in Vermont so it was originally made over the fire, however I have also made this in the oven and it turned out wonderful.

The recipe is for baked pumpkin so you will need a small cooking pumpkin, the smaller they are the sweeter they seem to be.
Cut the pumpkin open at the top and remove the seeds (save them for a yummy snack that will come later).
Fill a small pan with water and turn the pumpkin upside down, place near the fire or into the oven (which will be 350 degrees) cook until it looks tender but before it starts to get lopsided and fall over.
Pull this adorable orange squash out and with oven mitts carefully turn it over.  Discard the water, dry the pan and spray bottom with a non-stick spray of your choice.  Also reduce the oven heat to approximately 250 degrees.
With a spoon carefully and slowly scrape around the inside of the pumpkin, peeling the soft squash away from the outer skin, try not to puncture the skin.  Mash up these parts as well as you can and add butter, your cut up apple, pumpkin pie spice (and other spices that you would like) and maple sugar, if you do not have maple sugar or just plain have never heard of it (don't worry I have only ever seen it in VT, but boy is it delicious) use a dash of maple syrup as a sweetening agent.
Place your pumpkin back into the oven, right side up, you can pop the lid on but it's not necessary.  Let it cook a little more slowly, your kitchen should start to have the distinct and delicious aroma of pumpkin pie.  My best guess is to give it at least 1/2 hour but keep an eye on it as, again, you do not want the walls to collapse.

VOILA! it's crust-less pumpkin pie!

Oh! and don't forget the seeds!  Clean the seeds and place on a baking tray, you know the flat kind, sprinkle liberally with maple sugar or brown sugar and let them bake low and slow at about 150 degrees until they have dried out and are crispy.  Generally I take my pumpkin seeds to the salty place, but I urge you to try them this way, it's a really pleasant surprise.

Enjoy - have a great holiday weekend!!!

~CM


Sunday, October 18, 2009

Chocolate yogurt?!? Is that legal?


Yes, I am feeling quite naughty today.  We also purchased some fresh milk that came from a chocolate cow.......well not really, the milk was fresh and it is chocolate flavored but the cow was a plain ol' vanilla one.  HeHeHe.  I thought it would be fun to take a little of my left over whipping cream and the chocolate milk and try to make a fun yogurt with it.  I think it will taste GREAT with some fresh bananas.  Now I have it in the yogurt maker and will have to wait all night for it to properly "yo" before trying it :(  The recipe I used was simple, tomorrow after work I will strain it to make it the thick creamy consistency that I love and then I shall eat it up YUM!


Chocolate Yogurt:
Yields 1 quart
1 C Whipping cream
1C Chocolate milk (it is a whole milk)  The farm it comes from is: Ronny Brook Farms, sometimes they distribute outside of New York, check your local health food store
2C Skim Milk


Slowly bring heat up to 180 degrees stirring to avoid burning the milk on the bottom of the pot.  Turn off heat and let the milk cool to between 108-112 (or whatever your yogurt culture calls for)  I use Yogourmet live culture.  And now I wait........I am not good at this part.  


More on the success or failure of this little experiment tomorrow!


Ta-ta


~CM


That chocolate cow would be so proud ;)

Chowder Head!


Hello fellow food passionistas.  I am hoping that everyone is well on this delightfully chilly weekend.  We missed our weekly farmers market but were able to stop at our little local healthy grocery store to get some provisions.  Oddly enough there were ears of corn which looked to be pretty good so we got some and today I tried my hand at a nice fresh corn chowder.  Since it is a milk based soup I used my slow cooker to avoid having the milk burn at the bottom of the pot.  For starters I have never tried corn chowder so this was a complete shot in the dark but as always it was a fun little adventure and of course turned into a great meal.  I consulted a couple of web recipes and came up with a hybrid recipe based on the ingredients that were available at home today.  


1-1/2 C skim milk
1 C heavy cream (if you want a flavorful and filling soup do it right- use the cream)
2 cubes of chicken stock*

3-5 ears of corn (de-cobbed)
1 cup baby carrots chopped small

2 celery stalks chopped small
1-2 shallots chopped small

1 Medium potato chopped small

Thyme (sprinkle lightly on top)

Kosher salt (to taste)

black pepper (to taste)


It was simple, put the milk and cream into the pot and chop everything up very small and add to the base.  Let it cook low and slow for 6 or more hours, stirring and tasting as the day wears on.  Many times people (including myself at times) will try their hand at a great soup recipe that they experienced while eating out but will substitute "diet" type foods (i.e. all skim milk instead of the cream) and wonder what happened to the flavor and texture of the recipe.  Flavorful food needs the correct ingredients, using a substitute will not get you to where you want to go.  I have been there, I have tried it and can tell you first hand you will end up with a product that is only partly half what you were aiming for.  Of course all good things should be enjoyed in moderation which is the balance I strive for continually. 


*For the chicken stock I made a batch of it previously and froze some in and ice cube tray so i had them at my disposal for cooking.  (I also did this with pesto, now I can have a fresh pesto dish on a moments notice!)

Bon Appetite!
~CM


Thursday, October 8, 2009

BEST COFFEE EVER!!!


I mean it, I truly had the best cup of coffee that I have had this side of the Atlantic.  As with all things in life when it comes to something I feel strongly about I don't simply like it, I LOVE it, and obsess over it and look for which place makes it better and then still find ways to improve upon that.  As an additional engagement gift we were sent a "Brikka" coffee maker.  It is a little stove top deal that makes espresso style coffee.  

First I should premise this story by stating that New York is afraid of good coffee even if you pay through the nose for it they are just not willing to grind it fresh or do any of the steps that would make it worthy of the price tag they deem appropriate.  Therefore I always look forward to the weekend mornings when I have the time to fire up my little grinder and make MY coffee MY way.  

I digress, the Brikka, is a percolator and it took about 3 minutes flat to produce the black gold that I had the pleasure of drinking this morning.  As an additional and ingenious treat I used coconut milk instead of almond milk or cows milk and it really made it sweet and creamy.   I think the only change I would make is to have steamed the milk so it was warm but I just did not think about it this morning pre-coffee.  I know for next time thought:)


To all the coffee lovers out there, I recommend one of these contraptions if you do not have one already. (by the way it's from Target!)


Signing off
~CM

Stew in 30 minutes?


It sounds crazy but it is true, well almost!  We recently got a pressure cooker as an engagement gift and last night we took it for a test drive.  I have never thought that owning a pressure cooker would change my life, but it has and it will continue to do so the more I use it in delicious fooding adventures.  Our pressure cooker is a three in one digital machine.  It can steam, slow cook and pressure cook, it can also just keep something warm which is a nice feature.  


But I digress!  Last night about 5pm I decided that it was the perfect crispy fall day for stew.  So I was feeling a little kitchen creative and decided to reconstitute a vegetable soup that I made over the weekend into the stew broth, it turned out great but was a little too peppery.  I stopped off at the store for a little 2 pound roast and ran home to share my ideas with Mr. Mouse.  Of course he loved it.  So we seared the beef and cubed it, in the meantime I cut up three potatoes and 8oz. of baby bella mushrooms and tossed them into the pot with the soup/veg liquid, I would tell you how much except that I don't know, there is a line inside the pressure pot that says "max" and has a 2 next to it, maybe that means 2 quarts?  So anyway, we had everything in the pot and set the pressure cooker up as the booklet directed (knobs turned, gaskets affixed, lid locked and loaded etc.) and set the timer for 30 minutes GO!  Our little machine started to huff and puff a bit so we respectfully moved away.......then it stopped.....and the timer was not counting down.  Darnit what went wrong?  It turns out nothing, the pressure will build up then the timer will count down, when I thought about it later it made complete sense.


During the time the stew was stewing the kitchen smelled wonderful, it smelled beefy and brothy and rich.  Oh were we excited!  Then we heart it, "BEEP"......."BEEP"........"BEEP".......it was done.  Now what to do?  There are knobs to be dealt with, a lid to be sweet talked and MY DINNER IS INSIDE THIS MONSTROSITY!!!!!  So me being the very patient person that I am run over and immediately disregard the safety instructions I have just read and throw the knob from pressure to steam.  Wow was that a totally bad idea!  There was literally delicious smelling but sort of greasy beefy steam blowing straight up to the ceiling for what seemed like forever, I finally got a towel thrown over it to help with the mess I created, good lord was it impressive.


When we finally felt it was safe to take the lid off we ladled some stew into 2 mugs and gave it a try.  OH IT WAS SOOOOOOO GOOD!!!!!  The meat was tender, yet flavorful, they potatoes were soft and delicious, the broth was unbelievable (I had 2 cups it was so good!)  And all that in, well considering searing time and cutting of extra veg and oh, don't forget the pressure building time, I would say an hour tops!  This is something that I would normally slow cook and it would take hours.  I can't wait to see what other delicious delectables this will produce for us, so far it was great and we look forward to having a long and happy friendship with our pressure cooker.


Until next time
~A very pressurized CM


My Blog List